Thursday, June 28, 2012

How to make a Grab My Button for your Blog

Lets make a Grab My Button for your Blog together.


I consider myself a visual learner, so when it comes to adding things to my blog, Facebook, and websites, I feel very intimidated. I couldn’t figure out how to get the little box underneath the button where you go to grab a person’s code. I learned how to add my Grab Button by using different tutorials I found on the internet, and lots of trial and error. Once I finally got it, I thought wow…this is super easy.

So here are some written and visual aids in how to make a simple Grab my button for your blog from start to finish. These instructions are on how I made mine, the software and programs I use. You can use others.

Things you’ll need:

1) A Photobucket account to store your little button picture in (www.photobucket.com). It’s free!

2) A picture of what you want to use for your button (widget).

3) Your favorite photo editing program. I have several free ones but absolutely love my Photoscape (free) editor.

4) Time to play.

Let’s get started!

Step One: Making your Button:

Choose a photo; make a word photo, or even your little avatar will make a cute grab it button. I used my logo, and added a frame around it. Let’s just take you avatar for this one.

In your photo editing program, resize your photo to 150 x 150. Save it on your computer.

1. Upload your photo to Photobucket. Once you upload the photo, you’ll see something like this.
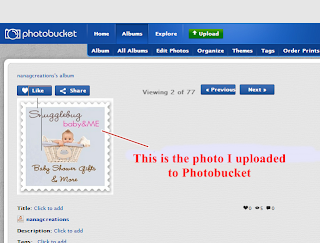


2. See the Share button above the picture? Click on it.


3. This is what you will see. Next click on the “Get link code”.


4. The one option that is checked off is called “Direct link for layout pages. The box is small and the print is smaller, but stay with me here, we almost have you a grab button. Put your cursor in the box and highlight the whole text (be sure you have it all by holding down your mouse key and dragging it to the end). Now… right click your mouse and click on “Copy”.

Then open a blank word document or you can use note pad if you want, and paste the text.

r

It should look something like this with an initial, numbers.photobucket.com – and so on.


So we are now all done with getting your button made, resized, added to your photo storage system (photobucket), and direct link copied. Ready for some Code?

Let’s get busy changing my code to yours!

Step Two: This is where you will need to take your time, check and double check that you are only deleting the highlighted words and adding your information to it. The photo’s below will show you what mine looks like, and what needs to be changed to yours. Be careful along the way that you don’t delete any quote marks (“) carat marks < > forward slashes // etc. They are all needed, and your links won’t work without them. Time to get crack-a-lackin!

Here is the information that is in my blog (its step 3 below, that we’ll get to in a moment).

Example 1


These are the areas that you will be changing:

Example 2


This is what gets replaced with your code.

Example 3


No, go back to your word document and copy down the exact code in Example 1 above. Remember that all the characters mean something in code so don’t forget any of them. Go ahead and do that now. I’ll wait here for you….

Done?

I have highlighted the exact information that you will be deleting from what you just did in yours, and told you what needs to go there in Example 3 above. Snugglebugbabyand me is now gone and you will be adding the name of your blog. The part that say insert a short name here is just something you make up. I just happened to use SnugglebugBB for mine.

I would follow the order of the different highlight colors for this so that you don’t get too confused. Yellow first, green second and the grey last.

The Grey part is what you uploaded to photobucket, copied and pasted (it starts out with “http:// and will end with “/>. Copy and paste that into the grey area.

Note: Don’t use any spaces in your coding even if it looks like there are in these directions, okay?

Step 2 done. Let’s finish this up so you can see the finished product.

Step Three: Open your blog and go to the Dashboard and Design page. I’m not using the updated blogger interface since I don’t know how to navigate around it yet, so I hope your screen will look like mine so we can finish this.
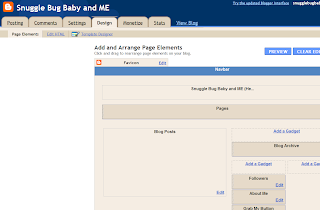

Click on Add a Gadget. A popup will want you to choose an option. Choose the HTML/JavaScript button (scared yet? Don’t be).
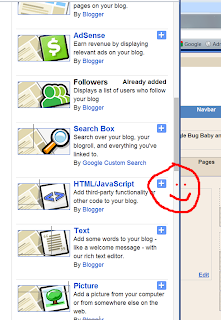

The next box will show up and this is where you will Title the button and enter the code we made in your word document.
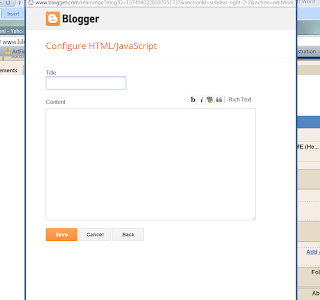

The name you put in the “Title” box is the name that will appear on your blog above the grab it button. Copy the code we just did in word and paste it in the content box, then click SAVE.

This is what it should look like.


Preview your page and see if it shows up on the side bar. If not, then go back into the gadget (Edit), and make sure that all the quote marks, forward and backward slashes are still there.

This is what my finished Grab My Button looks like:

I hope this tutorial was helpful to those that didn’t have a clue on how to do a button. Good luck and I’d love to know if it worked out for you!


Tuesday, June 26, 2012

Grab my Button?


I just learned how to make and add a "Grab my Button" widget to my Blog. I typically am very intimidated by Blogs, Facebook, and anything that has to do with html coding, but this was easy. For me to say this was easy... it had to be.

Should I do a tutorial for it? You tell me..


Sunday, May 27, 2012

Part Three: Banners, Logos, and more....

as I was saying, it was time to change the look and feel of my website to ensure that my customers could tell immediately what we offer.  I checked alot of websites and their previous work and decided on Winchester Lambourne on Etsy.  She just knew right from the start what was needed and I highly recommend her. We worked together on the Banners, sweet little logo, and 2 product inserts.

After that was completed, it was time for my business materials. Ordering business cards, professional hang tags, and labels. I decided to stay with my tried and true resources. For business cards I use Vistaprint as they are the most economically priced, and for my hang tags I use Print Runner. I have found their customer service to be wonderful, and their return response time superb. For my labels, I can't say enough about my choice on those as well.  Dianna, at Custom Couture Labels, has some pretty awesome deals.

Adding my banners to my sites went smoothly. Adding all the products was a chore though since I had added the name of Nana G Creations on most of my product photo's. So I'm still in the process of retaking pictures or attempting to fix the one's I can't retake. It's still very much a work in progress, so you may see Nana G Creations name on some for awhile.

I hope you found some of my journey helpful if you ever decide to get started on your own.  So as of today, my website is open for business - Snugglebug Baby &ME, and my Etsy and Artfire shop will soon follow.

Thanks for taking the time to follow my journey.

The Beginning....
Maureen

Thursday, March 22, 2012

Part Two: How I started re-positioning - "The Name"

I've told you why I wanted to re-brand/re-position Nana G Creations, so here is my journey.

Step 1 - was to come up with the name.  I wanted it to be cute, whimsical, and timeless. Snuggle Bug Baby has been a nick name for babies for as long as I can remember. From Newborns to around five or six years of age, child love to snuggle up with their parents. Parents call their children their little Snuggle Bugs, or Cuddle Bugs from the time they are born.  I know for me personally, all my children where snuggle bugs.

Since the name is popular, and I produce more than just baby products, I wanted to also include another name factor that would stand out.. "ME".  I thought that would encompass the Mom's, Grandparents, and such. So now, I found a name that I love that truly says what I'm all about. Great right?

Step 2 - Is the name available? When you want to begin selling online, you need to exhaust every avenue of making sure that you can use the name on every media that you plan on using, such as websites (Etsy, Artfire, website, blogger, Word Press, Facebook, etc). First and foremost is check to see if the name is available as a .com. I went to Go Daddy and found the name was available...Awesome! Etsy, well there were several Snuggle shops, some for babies, and some that had nothing to do with them, so I guess those sellers just fell in love with the name as I did.  Okay, moving forward to Artfire (in the event I want to eventually open a shop there) and it's open on that one, Awesome! Blogspot, available! Last was Facebook, Available, I'm on a roll.. Twitter... :(  Taken, but I was able to find that SnuggleBugBBMe was available.

Step 3 - So, once I found that each of my tended web places that I wanted for a presence was available, I went to work securing each of them, starting with purchasing a domain. I had already months ago signed up for the free site through Supa Dupa when they were offering an introduction offer. I learned through the process of opening Nana G Creations, that you need to make sure that your eggs are not in one basket, and your business name is on several venues.

Once I secured all the different sites for Snuggle Bug Baby & ME, it was time to come up with a Banner/Avatar/logo so stay tuned for that journey.... to be continued..


Saturday, March 10, 2012

My Journey in Setting up a New Website

I've been into this process for the last several weeks, so I will need to go back a little ways and catch up.

The Idea:


I've been thinking about a rebranding of Nana G Creations ("NGC") for about 6 months. I've gone back and forth with the indecision, should I, or shouldn't I? I opened NGC in October 2010 with my own website www.nanagcreations.com, opened a free shop on Art Fire www.artfire.com/shop/nanagcreations in March of 2010 and converted to a pro shop in October 2010, a Zibbet shop in October, then in February 2011 I set up shop at Etsy. www.etsy.com/shop/nanagcreaions.  Why so many? To get my business name in as many places on the web as I can.

Each website has been able to generate enough income to justify any fees I am paying, so I'm thankful for that. Lately though, the sales have been really picking up and I'm staying very busy.

Okay back to the original idea on why I am re-branding myself.  Although I love Nana G Creations, the name does not immediately tell a buyer exactly what I specialize in. I originally envisioned NGC as a selling site that would include other items that I love to make as well as baby products. It hasn't turned out as I originally planned, and therefore, the idea to make a big change and give my baby products a deserving name was born.

Part 2 - How I started out re-branding is next. to be continued.........


Sunday, March 4, 2012

Just getting started

Hello,

I'm just getting started with getting everything up and ready for my new launch. Stay tuned!